In this article we are going to discuss about minimal apis and implementation of minimal api with .Net 6.0.
What we will learn :
- What is minimal api
- Uses of minimal api
- How to create minimal api
- Step by step implementation of minimal api
- CRUD operations using minimal api
Prerequisites :
- Visual studio 2022
- Sql Server & SSMS
- Dot.Net 6.0 (.Net 6.0)
- Chrome / Or any modern browser / Postman (Any one for testing)
What is minimal apis ?
In .NET 6.0, Minimal APIs are a new and straightforward way to create web services. They’re designed to simplify the process of building basic web APIs by reducing the amount of code you need to write. With Minimal APIs, you can define what your web service does and how it responds with just a few lines of code, compared to the more complex setup required by traditional ASP.NET Core applications.
These APIs are perfect for small projects or scenarios where you don’t need all the features and flexibility of a full-blown web application. They strip away unnecessary complexity, making it easier for developers to focus on the core functionality of their service without getting bogged down in setup and configuration.
Minimal APIs still leverage the power of the ASP.NET Core framework, so you’re not sacrificing performance or scalability. Instead, you’re just getting a more streamlined development experience that’s ideal for quick prototypes, microservices, or lightweight applications.
Uses of minimal apis :
Here are some uses of minimal apis.
- Rapid prototyping: Quickly create and test new ideas or features with minimal setup and overhead.
- Microservices architecture: Develop small, independently deployable APIs for specific functions within larger applications.
- Serverless applications: Build lightweight APIs optimized for serverless platforms such as Azure Functions or AWS Lambda.
- Simplified CRUD operations: Implement basic Create, Read, Update, Delete operations for managing data with minimal boilerplate code.
- Lightweight utility endpoints: Create simple APIs for tasks like data validation, transformation, or integration with external services.
Step by step implementation :
Step 1 : Create .Net 6.0 empty API proj
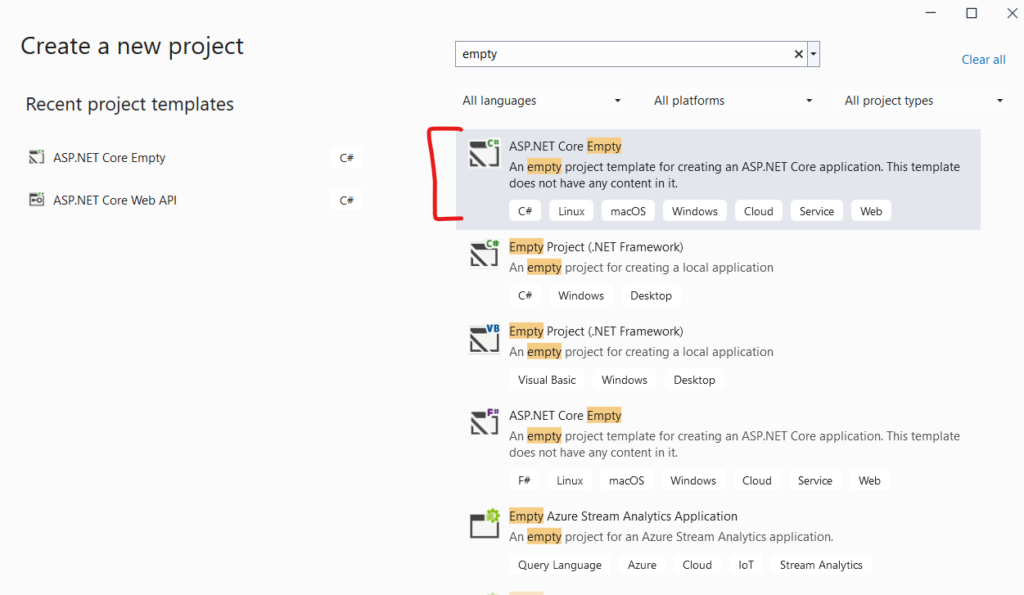
Open visual studio and select ‘Create New Project’ and than select ASP.NET Core empty template. After selecting template click on next button.

Give your project name, and enter path/location for your project.

Select .Net version as 6.0 in framework and check options ‘Configure for HTTPS’.

Step 2 : Add following nuget packages and dependencies to your project
Add following dependencies/nuget to your project one by one from your nuget package manager in visual studio. Make sure versions are compatible with your target framework of your project.
Entity framework’s packages will be used for database related operations and database designs and swashbuckle package will add swagger open api support to your project.

Step 3 : Add model folder in your project
Add new folder named ‘Model’, this will be used to add to your database model classes and data context file as we are using code first approach for database creation.

Step 4 : Add one new data model class in your model folder and add reference in your db context class
Add employee class with following fields in your model folder.

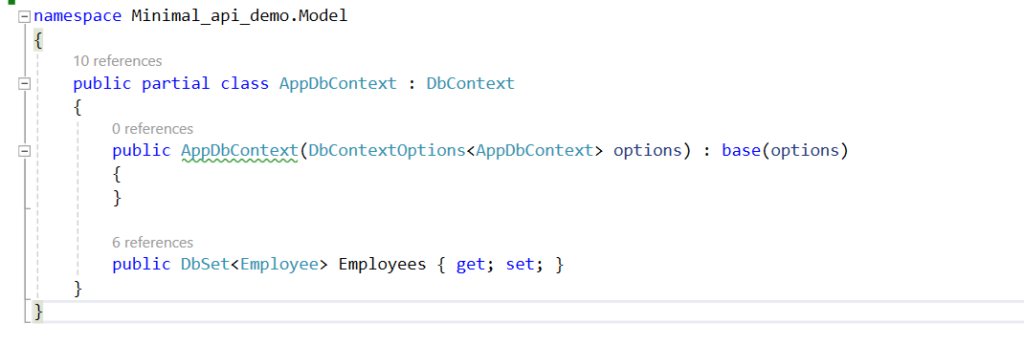
Create your AppDbContext class derived from DbContext class and than add your employee class reference in your dbcontext class as shown below.

Step 5 : Add database connection string
Now next step is to add connection string of your database in appsettings.json file in below format. Below connection string is with windows authentication format so no username and password is required.

Step 6 : Register dependency for your dbcontext and Apply migrations to create database
Now you have to register your database dependency in your program.cs file to apply migration with code first approach.
After adding dependency in program.cs you can use command ‘Add-Migration Initial’ to create your first migration.
After creating migration you can use ‘update-database command’ to create your database. Once above commands executed successfully you can verify your database tables and changes in sql server management studio.
If you’re getting any errors than make sure your database connection string is correct and repeat step 6.

Step 7 : Create api endpoint to get all employee list
After successful database creation (step – 6), now let’s add our first minimal api endpoint in program.cs file to get all employee list.
In minimal api pattern you don’t need to add separate api controller, you can add all your endpoints directly into program.cs file.

Step 8 : Create api endpoint to add new employee
You can write post api endpoint as shown below with three parameters in app.MapPost method to add new employee.

Step 9 : Create api endpoint to delete existing employee by id

Step 10 : Add swagger support to your minimal api
Register swagger service in your program.cs file as show below.

Register swagger and swagger UI middlewares as show below.

Step 11 : Run application
Run your api and navigate to swagger index page using url ‘https://localhost:port/swagger/index.html’ to view and test all your api endpoints.

In this article we have implemented 3 api endpoints, get all employees, add new employee and delete employee by id.
Remaining 2 api endpoints, get employee by id and update employee you can implement by your self for practice.
Thanks for reading this article, i hope you found this valuable.

