Right Click Is Disabled...

DotNet Core

DotNet Core

Implement minimal api with .Net core 6.0

In this article we are going to discuss about minimal apis and implementation of minimal api with .Net 6.0.

What we will learn :

Prerequisites :

What is minimal apis ?

In .NET 6.0, Minimal APIs are a new and straightforward way to create web services. They’re designed to simplify the process of building basic web APIs by reducing the amount of code you need to write. With Minimal APIs, you can define what your web service does and how it responds with just a few lines of code, compared to the more complex setup required by traditional ASP.NET Core applications.

These APIs are perfect for small projects or scenarios where you don’t need all the features and flexibility of a full-blown web application. They strip away unnecessary complexity, making it easier for developers to focus on the core functionality of their service without getting bogged down in setup and configuration.

Minimal APIs still leverage the power of the ASP.NET Core framework, so you’re not sacrificing performance or scalability. Instead, you’re just getting a more streamlined development experience that’s ideal for quick prototypes, microservices, or lightweight applications.

Uses of minimal apis :

Here are some uses of minimal apis.

  • Rapid prototyping: Quickly create and test new ideas or features with minimal setup and overhead.
  • Microservices architecture: Develop small, independently deployable APIs for specific functions within larger applications.
  • Serverless applications: Build lightweight APIs optimized for serverless platforms such as Azure Functions or AWS Lambda.
  • Simplified CRUD operations: Implement basic Create, Read, Update, Delete operations for managing data with minimal boilerplate code.
  • Lightweight utility endpoints: Create simple APIs for tasks like data validation, transformation, or integration with external services.
Step by step implementation :

Step 1 : Create .Net 6.0 empty API proj

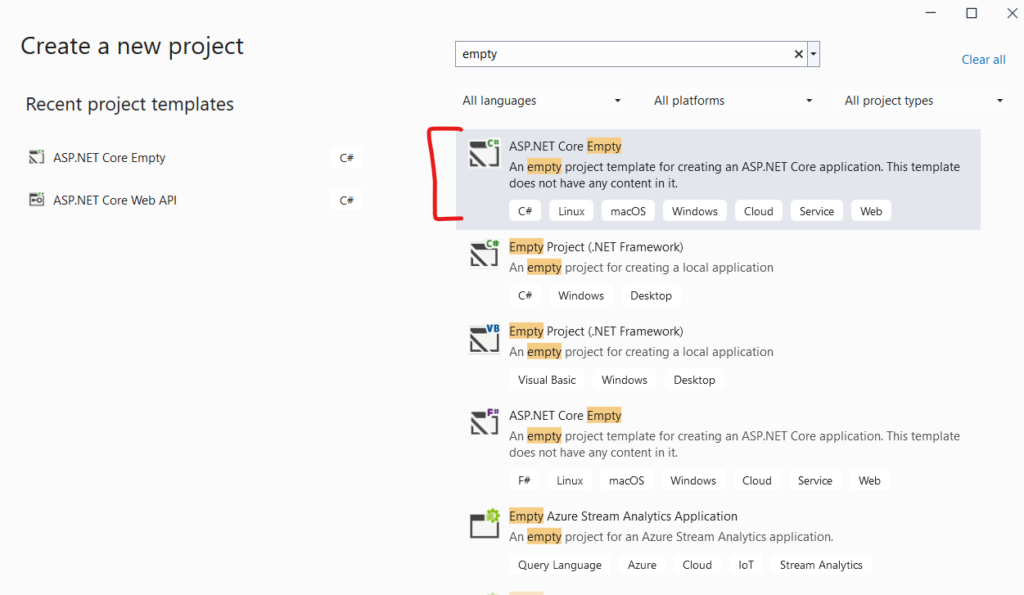
Open visual studio and select ‘Create New Project’ and than select ASP.NET Core empty template. After selecting template click on next button.
Give your project name, and enter path/location for your project.

Select .Net version as 6.0 in framework and check options ‘Configure for HTTPS’.

Step 2 : Add following nuget packages and dependencies to your project

Add following dependencies/nuget to your project one by one from your nuget package manager in visual studio. Make sure versions are compatible with your target framework of your project.

Entity framework’s packages will be used for database related operations and database designs and swashbuckle package will add swagger open api support to your project.

Step 3 : Add model folder in your project

Add new folder named ‘Model’, this will be used to add to your database model classes and data context file as we are using code first approach for database creation.

Step 4 : Add one new data model class in your model folder and add reference in your db context class

Add employee class with following fields in your model folder.

Create your AppDbContext class derived from DbContext class and than add your employee class reference in your dbcontext class as shown below.
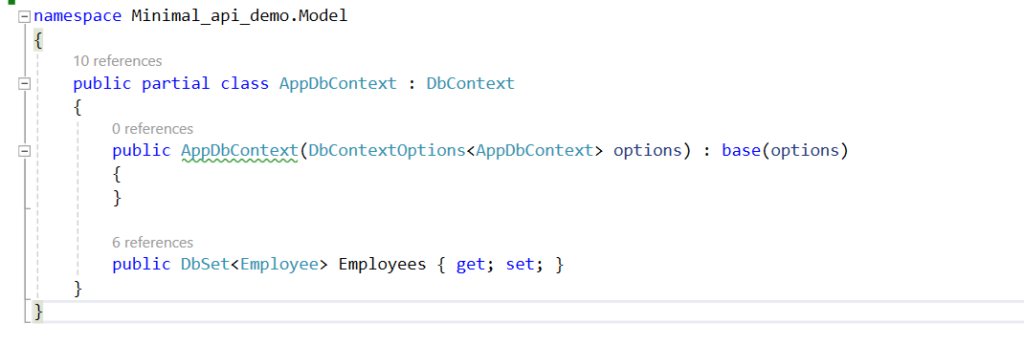
Step 5 : Add database connection string

Now next step is to add connection string of your database in appsettings.json file in below format. Below connection string is with windows authentication format so no username and password is required.

Step 6 : Register dependency for your dbcontext and Apply migrations to create database

Now you have to register your database dependency in your program.cs file to apply migration with code first approach.

After adding dependency in program.cs you can use command ‘Add-Migration Initial’ to create your first migration.

After creating migration you can use ‘update-database command’ to create your database. Once above commands executed successfully you can verify your database tables and changes in sql server management studio.

If you’re getting any errors than make sure your database connection string is correct and repeat step 6.

Step 7 : Create api endpoint to get all employee list

After successful database creation (step – 6), now let’s add our first minimal api endpoint in program.cs file to get all employee list.

In minimal api pattern you don’t need to add separate api controller, you can add all your endpoints directly into program.cs file.

Step 8 : Create api endpoint to add new employee

You can write post api endpoint as shown below with three parameters in app.MapPost method to add new employee.

Step 9 : Create api endpoint to delete existing employee by id

Step 10 : Add swagger support to your minimal api

Register swagger service in your program.cs file as show below.

Register swagger and swagger UI middlewares as show below.

Step 11 : Run application

Run your api and navigate to swagger index page using url ‘https://localhost:port/swagger/index.html’ to view and test all your api endpoints.

In this article we have implemented 3 api endpoints, get all employees, add new employee and delete employee by id.

Remaining 2 api endpoints, get employee by id and update employee you can implement by your self for practice.

Thanks for reading this article, i hope you found this valuable.

Implement minimal api with .Net core 6.0 Read More »
dotnetcore-cqrs-banner

Implementing MediatR & CQRS pattern with .Net 6 Api

In this article we are going to learn about implementation of MediatR and CQRS pattern with .Net 6 Web API.

What we will learn :

Prerequisites :

Introduction to CQRS :

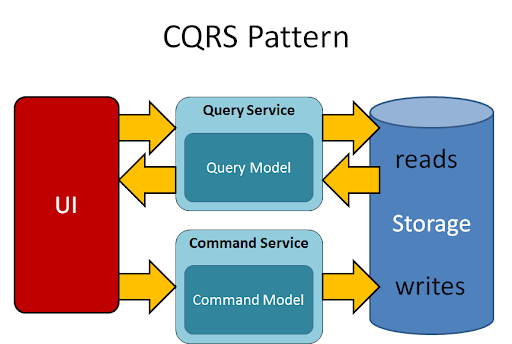
CQRS stands for Command and Query Responsibility Segregation and it is used to separate read(queries) and write(commands). In CQRS, queries perform read operation, and command perform writes operation like create, update, delete, and return responses.

CQRS splits an application’s data model into two parts: one for reading data (queries) and another for writing data (commands). This separation allows for better scalability, flexibility, and optimization of each part of the system independently, as the needs for reading and writing data often differ in complex applications.

See below diagram of CQRS pattern for better understanding :

When to use CQRS ?

CQRS can be used in complex systems where separating read and write responsibilities can simplify design and enhance performance. It’s very beneficial for applications with high scalability requirements. It introduces additional complexity so you should consider this carefully based on the specific demands of the project.

For example if you have project with few modules and with very few requirements and complexities than you can create your api project without any CQRS pattern.

But if you have large scale applications where performance matters and if project is going to scale big and may become more complex in future than you can follow CQRS pattern with MediatR so you can optimize your system in long term.

What is MediatR ?

MediatR is a popular open-source library for .NET that simplifies the implementation of the mediator pattern. It is used to communication between different parts of an application by decoupling request processing from the sender and receiver.

With MediatR, you can define commands/queries and corresponding handlers, allowing for cleaner, more maintainable code through separation of concerns. This pattern is most commonly used with CQRS pattern in .Net.

Now let’s move on our next part to implement this step by step in our .Net project.

Step by step implementation :

Step 1 : Create .Net 6.0 API proj

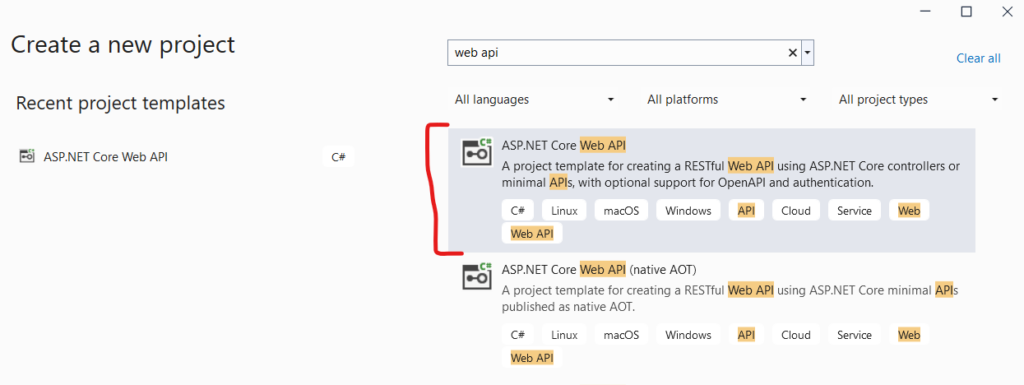
Open visual studio and select ‘Create New Project’ and than select ASP.NET Core Web Api template. After selecting template click on next button.

Give your project name, and enter path/location for your project.

Select .Net version as 6.0 in framework, keep authentication type as none, check options ‘Configure for HTTPS’, ‘Enable Open API support’, and ‘Use controllers’.

If you check ‘Enable OpenAPI support’ option than it will add swagger to your project automatically while creating project so you don’t have to add it manually.

Step 2 : Add following nuget packages and dependencies to your project

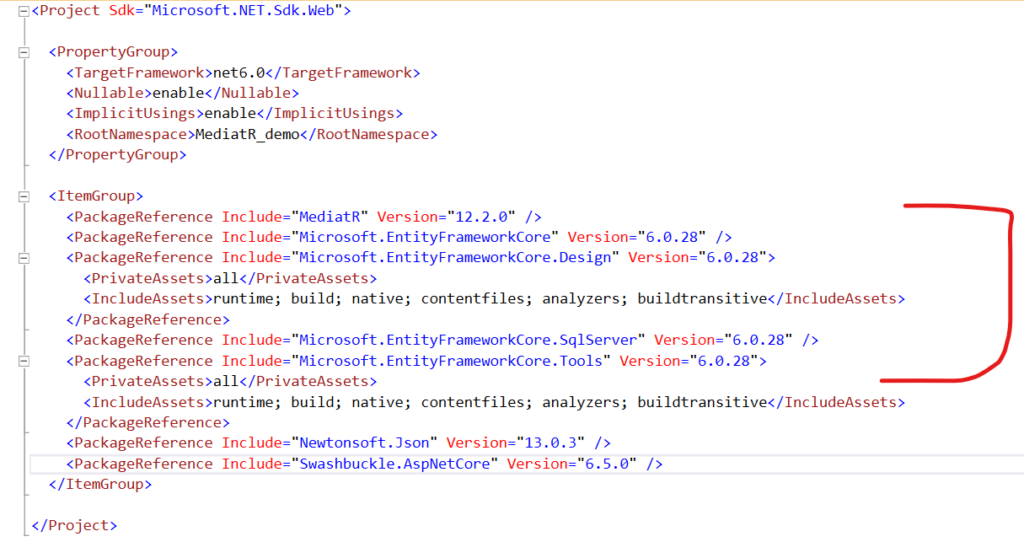
Add following dependencies/nuget to your project one by one from your nuget package manager in visual studio. Make sure versions are compatible with your target framework of your project.

Entity framework’s packages will be used for database related operations and database designs and MediatR package will be used to implement mediatr pattern in our project with CQRS.

Step 3 : Add following folders in your project

Add following folders Commands, Queries, Handlers, Model and Services one by one.

  • Command folder will be used to keep your MediatR commands
  • Queries folder will be used to keep MediatR queries
  • Handlers folder will be used to keep MediatR handlers
  • Model folder consists your database model classes and dbcontext class
  • Services folder will be used to keep your interfaces and repositories

Step 4 : Add one new data model class in your model folder and add reference in your db context class

Add product class with following fields in your model folder.

Create your AppDbContext class derived from DbContext class and than add your product class reference in your dbcontext class as shown below.

Step 5 : Add database connection string

Now next step is to add connection string of your database in appsettings.json file in below format. Below connection string is with windows authentication format so no username and password is required.

Step 6 : Register dependency for your dbcontext and Apply migrations to create database

Now you have to register your database dependency in your program.cs file to apply migration with code first approach.

After adding dependency in program.cs you can use command ‘Add-Migration Initial’ to create your first migration.

After creating migration you can use ‘update-database command’ to create your database. Once above commands executed successfully you can verify your database tables and changes in sql server management studio.

If you’re getting any errors than make sure your database connection string is correct and repeat step 6.

Step 7 : Add one service for CRUD with interface

Now let’s add one interface for our CRUD operations related to table product. Add interface as shown below with 5 methods for CRUD operations for products.

After adding interface you have to create repository for and have to implement all methods as below. Make sure all interface methods are implemented correctly and build is successful till now.

Step 8 : Add your first MediatR query in queries folder and handler and in handlers folder

Now let’s create our first MediatR query to get/read product list as shown below. Here our query implements IRequest interface from MediatR library.

Also make sure you add query in queries folder of your project.

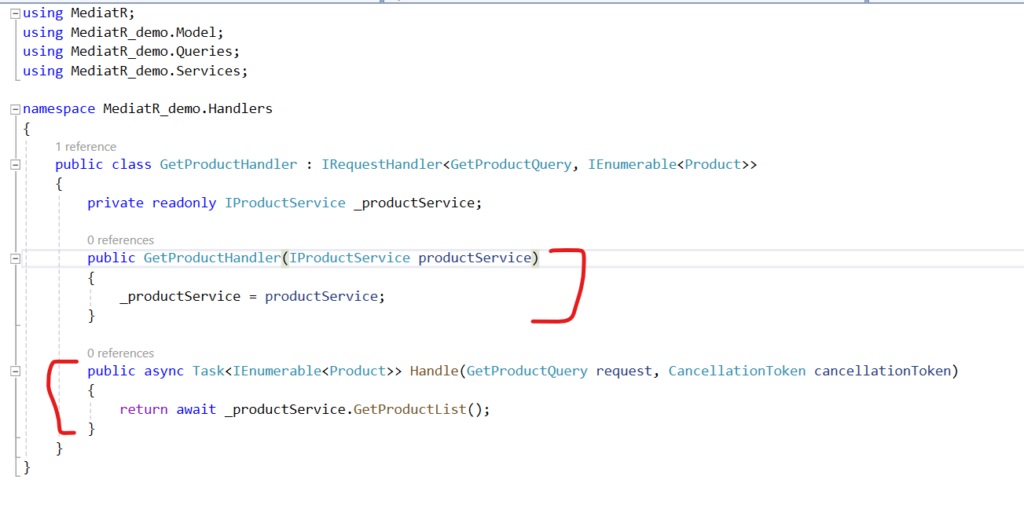
After adding query add handler for your query referencing your above query as shown below. Here our handler implements IRequestHandler interface from MediatR library.

Also make sure you add handler in handlers folder of your project.

Step 9 : Add your first command and command handler

Now let’s add our first command to add new product in our database as shown below. You can command in commands folder of your project.

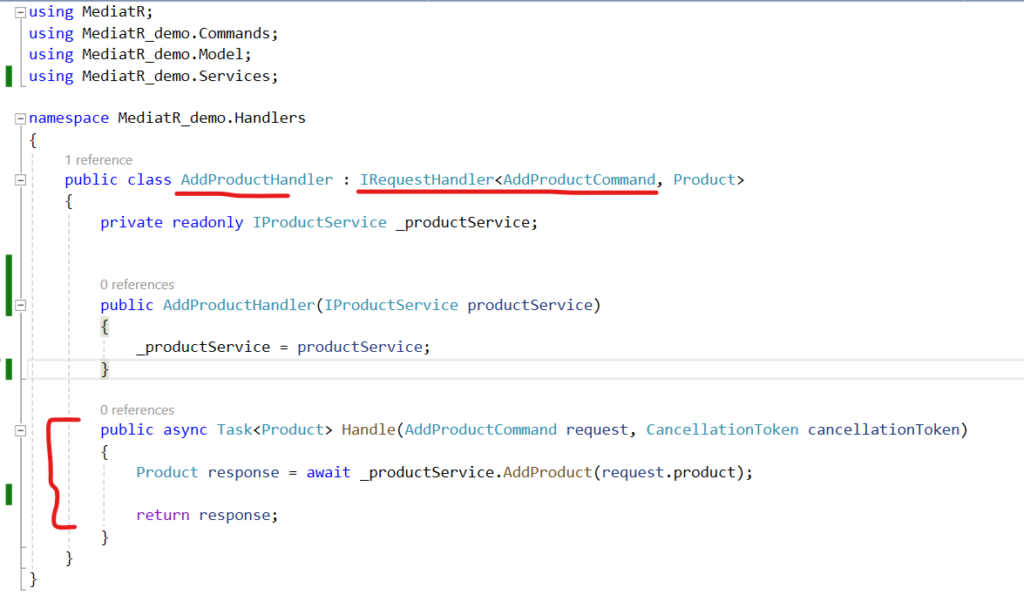
Now Let’s implement command handler for above command.

Our all commands have reference of repository inside it injected in constructor so it will call respective repository methods and will perform database operations.

Step 10 : Add api endpoints in api controller

Now let’s add our first api controller with 2 api endpoints. First one is to get all product list and second one is to add new product as show below.

In CQRS and mediatr pattern we will not call our repository’s methods directly from our api controller but we will use MediatR queries and commands for respective operations as shown below.

Step 11 : Register MediatR and service dependencies in program.cs file

Now let’s add dependencies for MediatR and our interface and services into our program.cs file as shown below. It’s necessary to all dependencies as shown below to run your project.

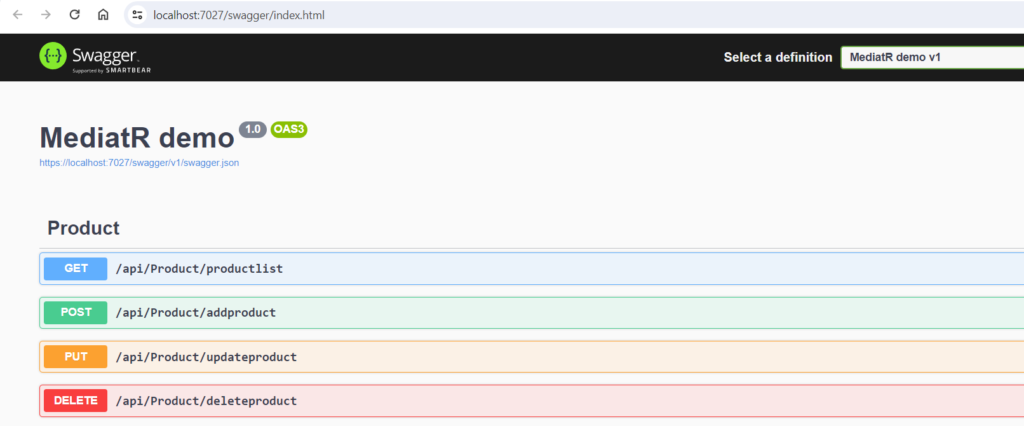
On successful run you will see swagger UI displaying all your API endpoints as shown below and you can test it from your browser or using postman.

In this article we have implemented 1 read query using MediatR to get all products data and one command to add new product data in database.

This is how your project structure will looks like after adding all commands and queries.

Remaining commands and queries you can implement by your self for update and delete and get by id operations.

Thanks for reading this article, i hope you found this valuable.

Implementing MediatR & CQRS pattern with .Net 6 Api Read More »