
Creating an Email Tracking Extension for Gmail
Introduction
Email tracking is a common practice used by marketers and individuals alike to monitor whether recipients have opened their emails. This article will guide you through the process of creating a Chrome extension that lets you track the emails you send and see whether they have been read or not. We will be achieving this by using a tracking pixel that will be a 1×1 image that is invisible to you and the recipient but notifies you when the email is opened.
Prerequisites
Before we start, make sure you have the following:
- Basic knowledge of HTML, CSS, and JavaScript.
- Google Chrome browser installed on your computer.
- A code editor for writing code. (VS Code would be best)
Step 1: Setting Up the Project
We’ll start by setting up the project directory and files. Create a new directory for your extension and create the following files inside it:

- manifest.json: This file contains metadata about the extension.
- popup.html: HTML file for the extension popup.
- popup.js: JavaScript file for the extension popup.
Step 2: Writing the HTML
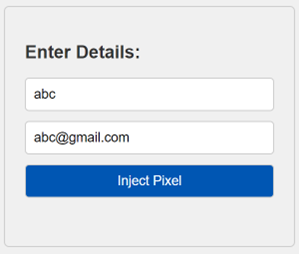
Open popup.html in your text editor and let’s add the structure for our extension popup:

Output:

Now add some CSS pizaaz..

Output:
Step 3: Writing the JavaScript
Now, let’s implement the functionality to inject the tracking pixel when the button is clicked. Open popup.js and add the following code:

Let’s break down this JavaScript code:
- We attach an event listener to the “Inject Pixel” button. When clicked, it executes a function.
- Inside this function, we retrieve the name and email entered by the user.
- We construct the URL for the tracking pixel, including the user’s name and email.
- Using Chrome’s chrome.tabs.query, we get the currently active tab.
- We then execute a content script using chrome.scripting.executeScript on the active tab. This content script will inject the tracking pixel into the Gmail message body.
- After successful insertion, we close the popup and show an alert message.
Step 4: Writing the Manifest File
Finally, let’s create the manifest.json file, which provides metadata about the extension:

Here’s what each key in the manifest means:
- manifest_version: Specifies the version of the manifest file format.
- name: The name of the extension.
- version: The version number of the extension.
- description: A brief description of what the extension does.
- permissions: Defines the permissions required by the extension, such as accessing active tabs and executing scripts.
- action: Specifies the popup that appears when the extension icon is clicked.
- background: Defines a background script or service worker for handling events and performing tasks in the background.
Step 5: Testing the Extension
To test the extension:
- Open Google Chrome and navigate to chrome://extensions/.
- Enable Developer mode.
- Click on “Load unpacked” and select the directory containing your extension files.
- The extension should appear in the browser toolbar.
Conclusion
In this detailed guide, we’ve learned how to create a Chrome extension for injecting a tracking pixel into Gmail messages. By following these steps, you can monitor when recipients open your emails, providing valuable insights into email engagement. Remember to use such tracking responsibly and respect the privacy of your recipients.
Creating an Email Tracking Extension for Gmail Read More »