Right Click Is Disabled...

Author name: Jigar Chaudhari

SQL Server Query Performance Optimization Tips

We are going to explain how to optimize SQL queries and improve query performance by using SQL query performance optimization tips and techniques. This SQL server query optimization is one of the most important parts of our System. Because without query performance optimization users are not satisfied to get the data faster.

We will discuss the best SQL server query performance optimization in this session.

1. Add missing indexes

Table indexes in the database help retrieve information faster and more efficiently. So When executing a query make sure it’s required indexes then make indexes. In the SQL server, When you execute a query please enable include the actual execution plan.

In the Below SQL query, we have to get username and clientID using the inner join clause. So we have to add where clauses to filter aggregations.

SELECT U.Username, 
       c.Clientid
FROM Users U 
INNER JOIN dbo.Clients C
    ON C.ClientId = U.ClientID
WHERE U.Userid=@Uid

After query execution Now we can see in the execution plan it informs you which columns the current SQL should be indexed, and how performance can be improved upon completion. So we can easily identify missing indexes and we will create indexes that are actually required. Before creating missing indexes we need to find out the actually efficient result provide for our system.

Now, Click on right-click to the missing index messages. And After that click on missing index details so will open a new SQL query window with actually missing indexes.
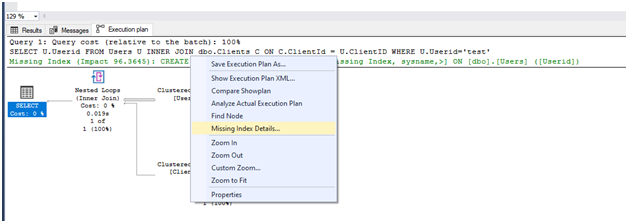
After that, we can see the NonClustered index in a query plan. Before creating an index add the name of the index

 Notes: Higher Creation of indexes also impacts our system. So to be careful don’t make more than indexes

2. Multiple tables join Query

It’s not possible for all field of data comes in one table. Because we have separated the field of data according to the normalization of multiple tables. Whenever we need a record of multiple tables then we are using the join query. so they will provide records of multiple tables

Let’s see on SQL Query,  In the Below SQL Query, we have added multiple join queries to get results. First of all, we have used tables using the lowest to largest records of tables. So In the above disk table we can see the user’s table total record is 1759, TrackData table total record is 49,496 and tbl_Travel table total record is 1,97,105. When we follow the smallest to the largest amount of table record to apply filters and aggregation then we get the fastest result compared to vice versa.

select distinct t.DeviceNo,
        tr.TravelFrom,
        tr.TravelTo,
        tr.TrackDateTime
FROM users u
inner join TrackData t
    on t.Uid = u.Uid
inner join tbl_Travel tr
    on tr.ID = u.uID
where u.Userid='test'

So here when we used multiple tables join query then add inner join first lowest record to largest record. So we can easily compare the smallest amount of records to more than records.
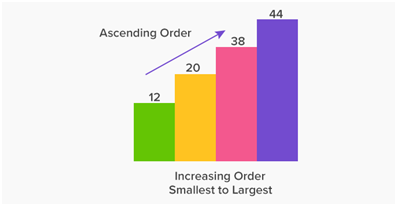
So whenever we needed multiple table join query then add inner join query accordingly smallest record table to the biggest records table. So after that, we can find easily fast minimal amount of records. Petty the data retrieved, the faster the query will run. avoid applying too many filters on the client-side, make filter the data as much as possible at the server. This limits the data being sent on the wire and you’ll be able to see the results much faster. 

3. With N0LOCK

If you need to run multiple SELECT queries from a large table or execute complex queries with nested looping queries, subqueries, etc. then best practice is to use a NOLOCK. If you are running a heavy query against a database. SQL server locks tables that are related to tables. That means that other users are not able to work with those tables which are already used in other queries. So whenever we need other query data so we do not get its records. We can solve this problem with NOLOCK.

Whenever executing a query then used the NOLOCK keyword after the table name so we can use those tables in other queries without locks.

4. Minimize large write operation

 When writing, modifying, deleting, or importing large numbers of data may impact query performance and even block the table. So it requires updating and manipulating data, adding indexes or checking constraints to queries, processing triggers, etc. And, writing more data will increase the size of log files. Thus, large write operations may not be a big performance issue, but you should be aware of their consequences and be prepared in case of unexpected behavior.

The best practices in optimizing SQL Server performance lies in using file groups that allow you to spread your data on multiple physical disks. Thereby multiple write operations can be processed simultaneously and thus much faster.

Compression and data partitioning can optimize performance and also help minimize the cost of large write operations.

5. Create JOINs with INNER JOIN (not WHERE)

The INNER JOIN statement returns all matching rows from two or more joined tables, While the WHERE clause filters the resulting rows based on the specified condition in a query. 

Let’s see how to optimize a SQL query with INNER JOIN on a particular example. We are going to retrieve data from the tables humanResources.department  and  humanResources.employeeDepartmentHistory where departmentIDs are the same.

Let’s, execute the SELECT statement with the INNER JOIN type: 

SELECT d.DepartmentID,
       d.Name,
       d.GroupName
FROM HumanResources.Department d
INNER JOIN HumanResources.EmployeeDepartmentHistory edh
        ON d.DepartmentID = edh.DepartmentID
SELECT d.Name,
       d.GroupName,
       d.DepartmentID
FROM HumanResources.Department d,
     HumanResources.EmployeeDepartmentHistory edh
WHERE d.DepartmentID = edh.DepartmentID

Both queries return the same results. 

6. SELECT fields instead of SELECT *

The select statement is used for retrieving data from the database. In the case of a large database, it is not recommended to retrieve all data because this will take more time to get data. If we execute the following query, they will get all data from users’ tables, and take more time they will take much memory and CPU usage. 

SELECT * From USERS

Instead, you can specify the exact column to get data. If you need then they will save database resources.  So the query will return the data at a lower cost. 

SELECT firstname, Lastname, Email From USERS

7. Avoid running queries in a loop

Coding SQL queries in a loop slows down the entire sequence. Instead of queries in a loop, you can use a bulk insert and update depending on the situation.

For example, we need to insert 1000 records, so when we will insertion them in a loop they will be executed 1000 times. So we avoid these running queries in a loop and we will use a bulk of insertions at a time. 

Inefficient

for (int i = 0; i < 10;  i++) {  
      //Insertion logic
}

Efficient

INSERT INTO TBL (A,B,C) VALUES (1,2,3), (4,5,6). . . .

SQL Server Query Performance Optimization Tips Read More »
Overview of ASP.NET Core SignalR

What is SignalR?

SignalR is a library for asp.net developers that can be real-time web functionality to the application. SignalR is one of the most important technology for creating real-time applications or web functionality. We can use this library in real-time applications like real-time gaming, live chat

SignalR provides a simple API for creating server-to-client remote procedure calls that call JavaScript functions in client browsers from server-side .NET code. SignalR is supported by both servers and clients. Easy to use in an application. SignalR it’s one type of web socket.

Benefits of SignalR

  • Apps need high-frequency data from the server. Like social networks, live chat, live gaming, etc.
  • Real-time monitoring like instant sales updates or travel alerts
  • An application which is required actual notifications. For example, social networks, email, chat, games, travel reports, and many other apps use notifications.

Features of SignalR

  • Handles connection management automatically
  • Sends messages to connected clients simultaneously. For example a chat room
  • Sends a message to specific clients or groups of clients

Hubs

SignalR uses hubs to communicate between clients to servers. Hubs handle all client’s calls to each other. A hub is a center point in an asp.net application. Hubs continue to be the main connection point between the server and its clients. Clients can invoke methods on the hub, and the hub can invoke methods on the clients.  The hub is handle a single connection to the group connection. For example, it can send a message to a single connection, or all connections belonging to single users or to a group of connections. All Clients are connected to the hubs so no need to make connections every time.

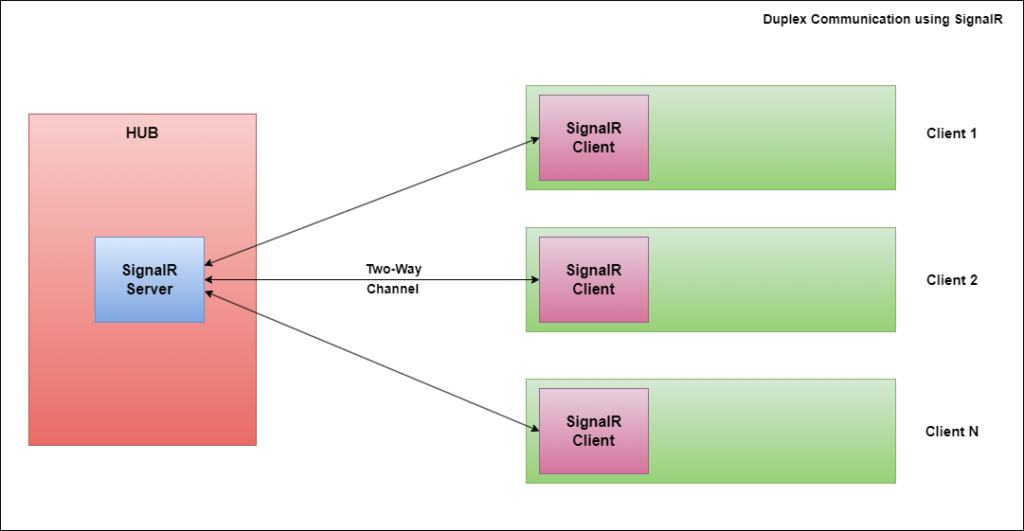
Block Diagram

In the above diagram, we can see All clients are connected to the Hubs. So Duplex communication is established in SignalR. In Between Server and Clients are sends messages to each other via Hub connection. We can send real-time notifications via this connection.

Create a signalR hub

using Microsoft.AspNetCore.SignalR;
namespace SignalRChat.Hubs
{
    public class ChatHub : Hub
    {
        public async Task SendMessage(string user, string message)
        {
            await Clients.All.SendAsync("ReceiveMessage", user, message);
        }
    }
}

In this Hubs SendMessage method was created which is calling by connecting all clients to the application.

Call client methods from the hub

We have called the hub method using javascript client calls. So first connection defines using one of the methods of the hub connection. In this javascript client code, we have connected with the ReceiveMessage channel so whenever receive a message in this channel this client receives messages.

connection.on("ReceiveMessage", (user, message) => {
    const li = document.createElement("li");
    li.textContent = `${user}: ${mes-sage}`;
    document.getElementById("messageList").appendChild(li);
});

Configure Signal

SignalR needs to be enabled in the application. To do this, make a few changes to Startup.cs. below is highlighted code inject into Program.cs file.  Mapping chatHub class in Program.cs file so we can use an entire application.

using SignalRChat.Hubs;
var builder = WebApplication.CreateBuilder(args);
builder.Services.AddRazorPages();
builder.Services.AddSignalR();
var app = builder.Build();

if (!app.Environment.IsDevelopment())
{
    app.UseExceptionHandler("/Error");
    app.UseHsts();
}

app.UseHttpsRedirection();
app.UseStaticFiles();
app.UseRouting();
app.UseAuthorization();
app.MapRazorPages();
app.MapHub<ChatHub>("/chatHub");
app.Run();

So This SignalR is useful in a real-time environment. we can easily send or receive messages to single users or groups of users. Most useful this SignalR in a notification, live chat, and live gaming

Overview of ASP.NET Core SignalR Read More »

Payment Gateway Integration With RazorPay In.Net Core

In this article we are discussing What is Razorpay, how to setup razorpay account and implement in Asp.net Core

What we will learn

  • What is Razorpay Payment Gateway?
  • Creating Razorpay Payment Gateway Account Setup
  • Integrate Razorpay Payment Gateway in ASP.NET Core

What is Razorpay Payment Gateway?

A payment gateway is an online service that authorizes and processes payments for online businesses. It is the connection between the customer and the merchant. Razorpay’s platform is designed to facilitate smooth and secure transactions, with features like easy integration, robust security measures, detailed analytics, and customizable checkout options. Some popular payments Gateway are below

  • PayPal
  • Stripe
  • Authorize.net
  • Amazon Payments
  • 2Checkout

Here, Razorpay Payment Gateway enables to accept payments via debit card, credit card, net banking, UPI, and popular supported wallets.

Creating Razorpay Payment Gateway Account Setup

  • Let’s sign up using this razor pay site https://razorpay.com/. you’ll need to some basic information about you business. we can sign up using a mobile number
  • After sign up it asks for the “business type” along with your name filling details and submit
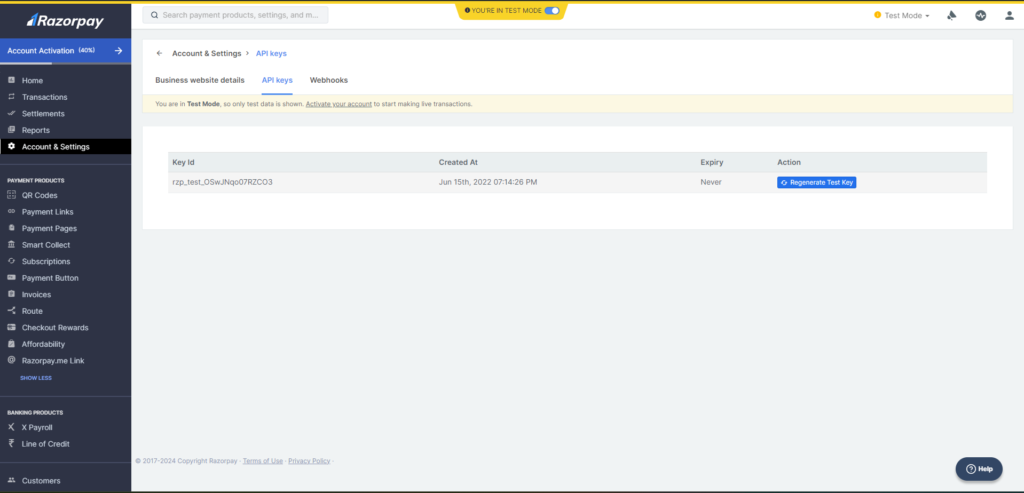
  • Log into the Razorpay Dashboard After that move to the Settings then API key tab and generate a key for the selected mode

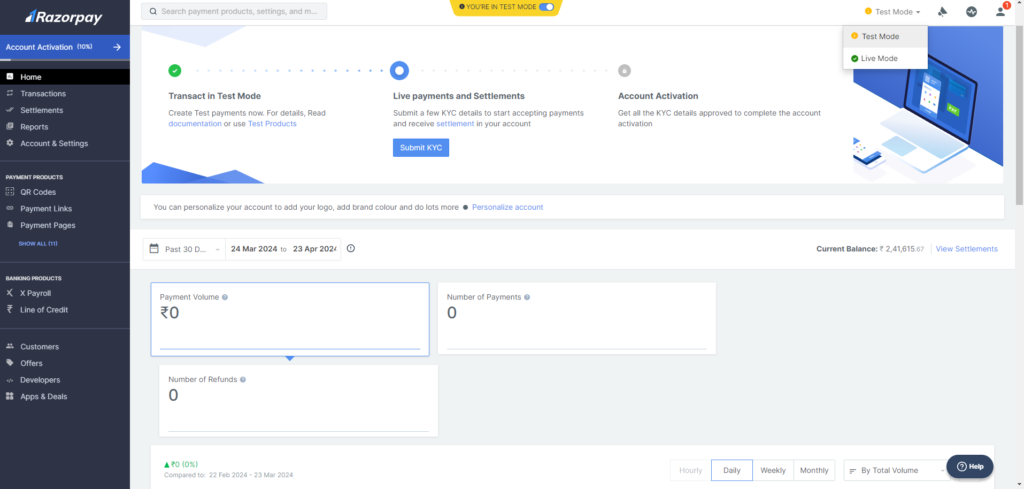
The razor pay payment gateway provides two modes Live and test mode. If we are beginner then start with test mode and test transactions without processing real payment. We can here use test cards, bank accounts and other payment methods which is provide by razorpay. Live mode If you are satisfied with your integration and testing in sandbox environment, you can switch test mode to live mode

Click on the Regenerate test key to open below pop up with razor pay key id and key secret and we can use this key id and key secret in our application. Remember this key id and the key secret is only for testing purposes and not will be used in the live application.

Integrate Razorpay Payment Gateway in ASP.NET Core

1.1  First Create ASP.NET Core MVC Project After that we need to Install the Razorpay package in NuGet using following command

Install-Package Razorpay -Version {version_number}

1.2  After installation we can use the Razorpay attribute in the asp.net core. So first I have created a payment button so that clicking on this button shows payment windows. Here we have used the below source code in payment.aspx.cs file to open payment windows.

# HTML Code

<div>
    <link rel ="stylesheet" href="https://maxcdn.bootstrapcdn.com/bootstrap/4.5.2/css/bootstrap.min.css">
    <button type ="button" runat="server" class="btn btn-primary" onServerClick="btnProceedToPay_Click" >
        Proceed To Pay
    </button>
</div>

1.3 Clicking on the button that calls btnProceedToPay_Click method. In this method first, create an order, and after that call the openPaymentwindow function in jquery. So in jquery, we can handle payment status.

C# – Button Click Event Call

protected void btnProceedToPay_Click(object sender, EventArgs e)
{
    decimal amountinSubunits = Convert.ToDecimal(TotalAmount) * 100;
    string name = "Google";
    string currency = "INR";
    string description = "Razorpay Payment Gateway";
    string imageLogo = "https://www.google.co.in/google.png";
    string profileMobile = "9187874598";
    string profileEmail = "test@gmail.com";
    Dictionary<string, string> notes = new Dictionary<string, string>()
    {
        { "note 1", "this is a payment note" },
        { "note 2", "here another note, you can add max 15 notes" }
    };
    string orderId = CreateOrder(amountinSubunits, currency, notes);
    string jsFunction = "OpenPaymentWindow('" + _key + "', '" + amountinSubunits + "', '" + currency + "', '" + 
                        name + "', '" + description + "', '" + imageLogo + "', '" + orderId + "', '" + 
                        profileName + "', '" + profileEmail + "', '" + profileMobile + "', '" + 
                        JsonConvert.SerializeObject(notes) + "'"); ";
    ClientScript.RegisterStartupScript(this.GetType(), "OpenPaymentWindow", jsFunction, true);
}

We can customize the below Details in the Payment windows.

  1. Title: Name of company, it will be shown on UI modal
  2. Description: Just a simple description of the purchase, it will also be shown in the modal. 
  3. Currency: Currency string of three characters
  4. ImageLogo: Link of Logo, must be min dimension 256×256 & max size 1MB, of Company to be shown on modal, in our example case we are using a google logo.
  5. ProfileMobile: prefilled mobile number
  6. ProfileEmail: prefilled email

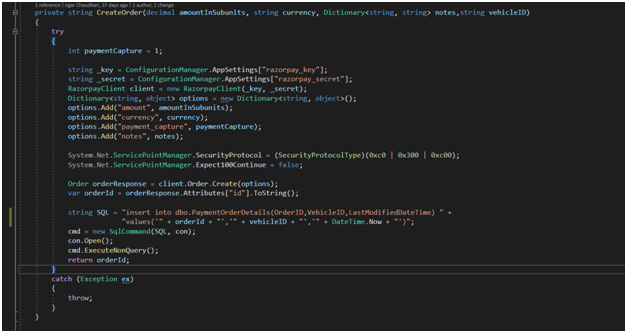
In the below code, we have used razorpay_key and razorpay_secret. Which is getting in the web config file. Whenever went with payment first order is created and after that payment is completed using orderID.

C# – Create Order Function Call

private string CreateOrder(decimal amountInSubunits, Dictionary<string, string> notes,)
{
    try
    {
        int paymentCapture = 1;
        string _key = ConfigurationManager.AppSettings["razorpay_key"];
        string _secret = ConfigurationManager.AppSettings["razorpay_secret"];
        RazorpayClient client = new RazorpayClient(_key, _secret);
        Dictionary<string, object> options = new Dictionary<string, object>();
        options.Add("amount", amountInSubunits);
        options.Add("payment_capture", paymentCapture);
        options.Add("notes", notes);
        ServicePointManager.SecurityProtocol = (SecurityProtocolType)(0xc0 | 0x300 | 0xc00);
        ServicePointManager.Expect100Continue = false;
        Order orderResponse = client.Order.Create(options);
        var orderId = orderResponse.Attributes["id"].ToString();
        string SQL = //INSERTION QUERY;
        cmd = new SqlCommand(SQL, con);
        con.Open();
        cmd.ExecuteNonQuery();
        return orderId;
    }
    catch (Exception ex)
    {
        throw;
    }
}

1.4 So now here we have calling jquery function to handle payment status. If any issues arrived during the payment transaction then we can handle using payment.failed method.

# jQuery – Send Pay Request


<script src="https://checkout.razorpay.com/v1/checkout.js"></script>
<script type="text/javascript">
function OpenPaymentWindow(key, amountInSubunits, currency, name, descritpion, imageLogo, orderId, profileName, profileEmail, profileMobile, notes) 
{
    notes = $.parseJSON(notes);
    var options = {
        "key": key, // Enter the Key ID generated from the Dashboard
        "amount": amountInSubunits, // Amount is in currency subunits. Default     
        "currency": currency, //currency is INR. Hence, 50000 refers to 50000 paise
        "name": name,
        "description": descritpion,
        "image": imageLogo,
        "order_id": orderId, //This is a sample Order ID. Pass the `id` obtained
                                      // in the response of Step 1
        "handler": function (response) {
        $.ajax({
            type: "POST",
            url: "frmExpiredVehicle.aspx/CreateOnlinePayment",

            // stored in  database using this method
            data: "{ TotalAmount:" + TotalAmount + ",'}",
            contentType: "application/json; charset=utf-8",
            dataType: "json",
            success: function (response) {
                var pID = response.d;   //successfully transaction
            },
            error: function (err) {
                alert(err);
            }
        });
    },
    "prefill": {
        "name": profileName,
        "email": profileEmail,
        "contact": profileMobile
    },
    "notes": notes,
    "theme": {
        "color": "#F37254"
    }
};
var rzp1 = new Razorpay(options);
    rzp1.open();
    rzp1.on('payment.failed', function (response) {
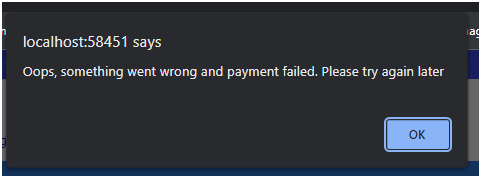
        alert("Oops, something went wrong and payment failed. Please try again later");
    });
}
</script>

Explanation of the above output:

  1. The user clicks on the button associated with the payment.
  2. A Modal open, which is provided by Razorpay opens in the middle of the window, Here the company name, the description, and the logo we have set before sending the request have been rendered here, also the contact number and email are prefilled.
  3. Even if we have prefilled some details Like mobileno and email also then we have access to change them during the proceeding to payment.
  4. After then, we can proceed to payment, let’s say we have chosen the card method, Here we have entered a test card detail “Card Number 4111 1111 1111 1111” expiry date can be any future month/year, CVV can be any three-digit number, also the name of the cardholder is prefilled here, but you can edit it before proceeding After that asking pin number you can enter any four digits and proceed.
  5. Then Immediately, Razorpay will process the payment.
  6. After completion once again Razorpay asks for your permission whether to do payment or not, click on success for proceeding with payment or click on failure to deny.

If payment is successfully done then we have received the below alert messages.

If payment failed then we received this message. It is always not possible to payment is successfully done. Sometimes we have facing issues like network issues, System down, incorrect OTP, and more.

Payment Gateway Integration With RazorPay In.Net Core Read More »